Page 1 of 6 123 ... LastLast
Results 1 to 10 of 52

Thread: DIY LED Work Light

  1. #1
    Certified Finest Installer Zach McGovern's Avatar
    Join Date
    Jun 2014
    Posts
    151
    Post Thanks / Like

    DIY LED Work Light

    As most of us know by now, lighting is crucial when doing any type of polishing or correction work.

    Aside from the overhead lighting (typically fluorescent) found in many garages and shops, most people rely on some type of spot light or work light to further enhance their ability to spot defects on the vehicle they are working on. Halogen work lights are very common for this application because they are cheap, readily available, and bright.


    Photo: Halogen work lights being used to show defects while correcting paint

    While halogen lights do work well in many cases, they certainly are not perfect. The biggest complaint I have about them is they are incredibly hot... sitting next to a set of 1000W halogen lights for 6+ hours in 80+ degree ambient temps is enough to make you hate the job you're working on. On top of that, halogens often do not do a good job at displaying micromarring or da haze. The warmer color temperature of these bulbs also make it difficult to see defects on brighter colored paints, like reds and blues, therefore I find myself double checking everything with another light source anyways.


    Many of us leave an inspection light of sorts nearby for this very reason. Whether it is a brinkmann dual xenon (mine just died, can we please have a moment of silence) or a high powered LED flashlight, most people would agree that these light sources are superior for final inspections as they typically work great at highlighting any fine haze or marring.


    Photo: LED Flash Light used for inspection


    With that in mind, I have been searching for the perfect LED spot light/work light for a while now. I recently purchased an LED work light from Home Depot (1720 Lumen) for around $80. I compared this light side by side with my halogens on some very metallic paint, and the LED was hands down superior. No, it was not nearly as bright (not even close!), but it showed WAY more defects than the halogens. It made me wonder why I was even using halogens anymore.


    Photo: LED light from Home Depot used to inspect paint


    I found this light to be much easier to work around as it did not put off heat, and did not require me to check each spot with my LED flashlight to ensure I was finishing down perfectly..... but with that being said, I still felt that there was room for improvement.


    I stumbled upon an older thread on Autopia where the OP (concours.john) created his own LED work light utilizing a stand from a twin halogen setup along with 2 LED spot light assemblies from a local hardware store. This setup, as seen below, seemed to be more along the lines of what I was looking for.


    Photo: DIY LED setup from Concours.John (OP on autopiaforums)


    With this design in mind, I set out to find an easier way to accomplish a similar setup. Given that I am a photography nerd, I remembered seeing a dual light bulb base setup that would work great for this. I set out to amazon and quickly found what I was looking for, and for only $9.


    Photo: Dual Bulb Base on Amazon


    I then searched my local hardware stores to locate some suitable LED spot lights that would fit this base. I was able to find these LED bulbs that are daylight temp (much better than the warm tones of halogens!) and 1400 Lumens each.


    Photo: LED Spot Light Bulb from Lowes


    Now, these bulbs are somewhat pricey at ~$35 each, but considering the single LED from the other hardware store was $80, the price seemed to be a fine deal.


    Once I had all of the pieces (light stand (which I already owned), dual bulb mount, and 2 LED bulbs) I assembled the unit and decided to do a bit of testing.


    Photo: Assembled "DIY Light"


    First, I turned just one LED bulb on and compared it with the HD LED fixture. While the HD LED fixture is capable of 1720 lumens and my single LED bulb is only a 1400 lumen bulb, it was clear the single bulb had a MUCH more focused beam of light that lit up the vehicle much better than the "brighter" setup from HD (also notice the color difference between the 2 setups).


    Photo: Comparing HD light to 1 bulb DIY Light


    I then installed the 2nd bulb into my DIY fixture, and of course, this just made it even better.


    Photo: Comparing HD Light to Dual Bulb DIY Light

    Note: In these photos it looks like the DIY fixture light is washing out the paint, however that is simply not the case in real life and it is just because the camera cannot capture the extreme dynamic range in these types of photos therefore that entire lit area appears to be overexposed. A closer look at the paint shows that these spot lights are a nice, focused beam of light that work great for this application (also notice my paint still looks great after 1.5 years :dblthumb2: )


    Photo: Showing inspection capabilities of DIY Light


    In the end, I spent a little bit more on my "DIY" rig than I did on the single light from Home Depot, but I feel it was well worth the added cost. This light is definitely a step up from the halogens (although those will still have a place, as I believe that checking your work in various light sources is very important!).


    Cost Summary
    Light Stand: $15 (Amazon Link)
    Dual Bulb Base: $9 (Amazon Link)
    LED Bulb (par38): $38 (x2) (Lowes Link)
    Total: $100

    Over the past 3 years that I have been using my halogen lights, I'd estimate I have purchased ~$50+ in bulbs, so I am really hoping these LED's live up to their life expectancy claims!


    Specs
    Output: 2800 Lumens (1400/bulb)
    Color Temp: 5000k (daylight)
    Power Consumption: 23 watts/bulb


    So next time you are shopping for a new detailing work light, consider this as a worthy option!

    -Zach
    Last edited by Zach McGovern; 06-04-2014 at 06:35 PM.

    Zach McGovern
    www.AttentiontoDetailingPeoria.com
    Specializing in Paint Correction & Premium Paint Coatings

  2. #2
    Certified Finest Installer Zach McGovern's Avatar
    Join Date
    Jun 2014
    Posts
    151
    Post Thanks / Like
    UPDATE:

    Spent several hours working with these new lights last night... this is the most time I have spent with them so far so I figured I would share some of my feelings.

    1) They are absolutely awesome at showing defects. The slightest towel marring/wash induced swirls were shown... not something I could ever see with Halogen lights

    2) I wish the stand went a bit lower... I will have to come up with a way to remove the lights from the stand and set them on the ground when needed. (Although Claude found another awesome stand that fixes this issue... will post a link to it in another post)

    3) These bulbs definitely do put off some heat, but it is WAY less than the Halogens... I mean WAY less. Here are some temp. readings.


    Halogen Case/Heat Sink:


    LED Case/Heat Sink:


    Halogen Face (stupid hot!):


    LED Face (the face of the bulb was cooler than the rear casing.. this was noticeable by touching each area as well):


    Still very pleased with these lights.

    Zach McGovern
    www.AttentiontoDetailingPeoria.com
    Specializing in Paint Correction & Premium Paint Coatings

  3. #3
    Certified Finest Installer Zach McGovern's Avatar
    Join Date
    Jun 2014
    Posts
    151
    Post Thanks / Like
    UPDATE #2: Claude's enhanced version of my project... he found another light stand that has a mounting location on one of the legs to offer the option of 4 lights running simultaneously, or simply moving the lights to the lower mount for lower panels. He also purchased another stand & boom to maximize the results with the lights on horizontal panels.

    Well....... I was going to wait till I got better pictures and one additional piece I've been waiting for, but I am so excited that I will share, and will do a follow up when the last piece comes in.

    I've been chatting back and forth with Zach about the pros/cons of his lighting system and with his input I set off to find something that would resolve some of the limitations he experienced. One of the expressed cons was that the light would not go low enough to do the rockers without setting the user on the ground to have the proper reflective angle. Well with that in mind I found this little gem


    This light stand has a toe stud on which a dual AC bulb flash light can be set up. For $13 shipped (since I have Amazon prime) could I go wrong?? It is definitely not meant to have a heavy load on it and its footprint is definitely not the most stable but does it do the work? Absolutely......

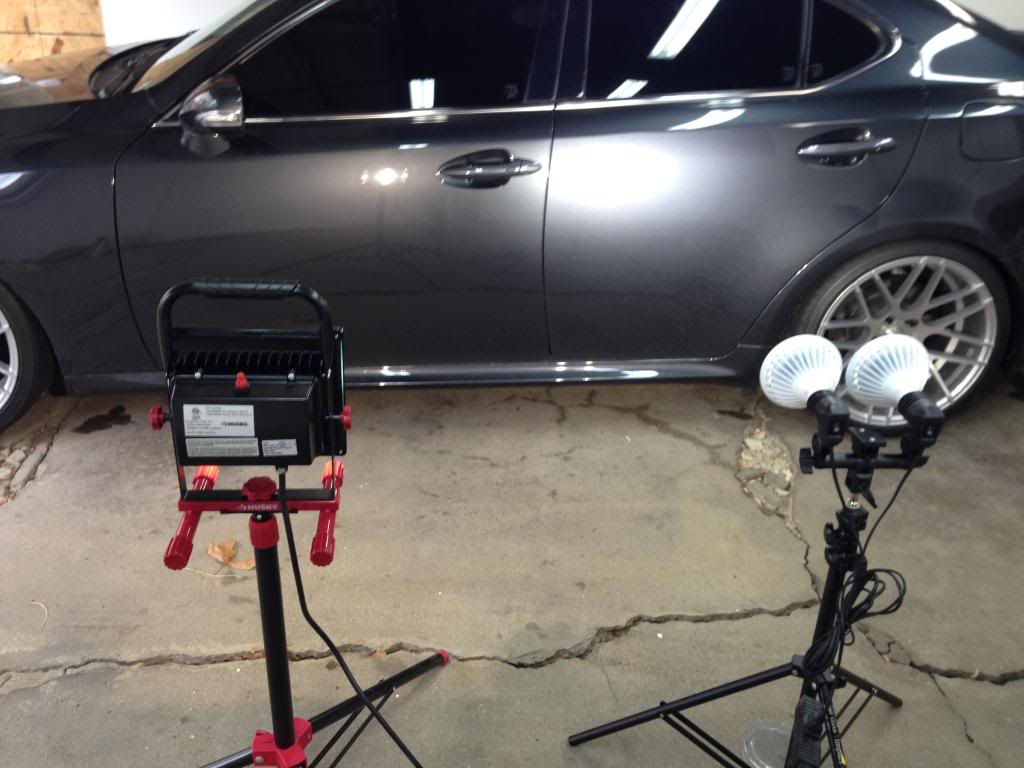
    Now I am going to share some ugly iPhone pics. Bare in mind that I was in the process of polishing this Mercedes S550 (in preparation for coating) and wanted to share my input (and set up) with Zach, so I snapped a couple of unprofessional pics and sent him those pics in the "raw". Before someone mentions it, I KNOW that I still have a lot of greasy polishing residue on the panel, so no flaming necessary!!! I also have to point out that Lowes only had two LED floods, so I could not show the full set up with 4 lights.


    ALL the pictures were taken from sitting on my little HF work stool. As you can see, the lights cover the whole door including the rockers without having to lay on the ground. To get the lowest portion of the rocker I have to sit on the floor and the light was just right (angled a little up and close to the panel)

    At its maximum height the center of the light is at 44", at the lowest level of the telescopic arm the center of the bulb is at 21.5", and on the foot stud the center of the bulb is at 8". Being that the lights are LED, you can have the light right next to your head and right close to the panel without fears of drying the product or overheating the panel.

    One thing to note, the closer your lights are to the panel the more effective lumens you have (basic light engineering). I did find that the lights were a little lacking in power (being used to 1000w work lights <---- affectionately called my "Hell lights") but the LEDs definitely cast a better light, and shows a LOT of defects which I would have to rely on bringing the car in the sun to inspect. I am kinda glad I only bought 2 LEDs at this time (since Lowes only had 2) because I have another light source coming in (kept secret for the time being)

    Anyway, you don't have to take my word for it but if you were to ask me if I like my set up....... well my answer would have to be "Seriously, if Zach lived any closer I would have to kiss him for helping me with my lighting set up".

    Now I chose to improve on his original idea (based on his feedback) but my research expanded to different light sources and other lighting set up. As a sneak peak into my next update I will leave you with this picture


    This is the best and most versatile boom light set up I have found (and if you know me, you know I am ridiculously analytical I am about research), and although I spent upwards of $75 for it, I would have spent double that if I knew what I know now. If the light source I have coming in is as good as I am predicting it will be, we may have a serious lighting project for amateur and professional.

    Stay tuned!!!

    Here is the link to the background light stand: 2 Studs back light stand

    Zach McGovern
    www.AttentiontoDetailingPeoria.com
    Specializing in Paint Correction & Premium Paint Coatings

  4. #4
    Certified Finest Installer Detailed Designs Auto Spa's Avatar
    Join Date
    Jun 2014
    Posts
    40
    Post Thanks / Like
    Smoking idea Zach. I've been thinking about working towards something similar. I may just copy your idea though.

    Do you find that the amount of lumens you're working with is washing out defects or is it ideal? I find that when lights put out too much, it washes it out. Have you played with different lumen bulbs?
    Detailed Designs Auto Spa
    Authorized CQuartz Finest installers offering Atlanta and the southeast professional quality auto detailing, paint correction and clear bra installation
    678-859-1795
    2161 Old Covington Highway SW, Suite B
    Conyers, GA. 30012

  5. #5
    Certified Finest Installer Zach McGovern's Avatar
    Join Date
    Jun 2014
    Posts
    151
    Post Thanks / Like
    Quote Originally Posted by Detailed Designs Auto Spa View Post
    Smoking idea Zach. I've been thinking about working towards something similar. I may just copy your idea though.

    Do you find that the amount of lumens you're working with is washing out defects or is it ideal? I find that when lights put out too much, it washes it out. Have you played with different lumen bulbs?
    These lights (2800 lumens... 1400/bulb) work great for me. They are a very focused beam of light... something like a 35 degree light pattern, compared to the very broad light pattern of other work lights such as halogens. This makes it very easy for me to spot defects, and even light marring.

    I will be doing a thorough article comparing different light sources for DI in the near future... will have plenty of pics showing side by side differences of the same panel being inspected with Halogen, LED (2800 lm DIY set), and LED Flashlight (251 lm).

    So far I am very happy with this DIY setup compared to the couple of LED lights I have purchased from retail stores and ended up returning (such as the home depot light shown in the first post).

    Zach McGovern
    www.AttentiontoDetailingPeoria.com
    Specializing in Paint Correction & Premium Paint Coatings

  6. #6
    Junior Member David@LakeCountryMFG's Avatar
    Join Date
    Jun 2014
    Posts
    20
    Post Thanks / Like
    This is a great, and I might need to make one myself in the next couple weeks. I have some of the other LED's from Home Depot, and while I do like them, this looks like a much better option...Thanks for the write up. I saw it on another forum and meant to comment....

  7. #7
    Certified Finest Installer CH.Detailing's Avatar
    Join Date
    Jun 2014
    Posts
    63
    Post Thanks / Like
    I remember reading John's thread back then and its been on my 'to do' list ever since. I have a couple burned out halogen stands, and I just cracked the face of LED Husky stand. This just got bumped up my list of priorities!
    Connor Harrison Detailing
    CQuartz Finest Installer for Madison, WI
    Inspection, Correction, Protection!

  8. #8
    Certified Finest Installer mobilejay's Avatar
    Join Date
    Jun 2014
    Posts
    27
    Post Thanks / Like
    Very nice, I may be setting up something like this for the shop. Thanks!

  9. #9
    ChrisDA
    Guest
    Love it! Great write up and certainly something I'll be purchasing soon!

  10. #10
    Certified Finest Installer
    Join Date
    Jun 2014
    Posts
    27
    Post Thanks / Like
    Thanks for sharing. Excellent idea and great writeup.

    Looks like I'm going on amazon to buy this stuff.

    Saw similar LED spot lights on sale at costco...about $12...I have some at home and will see how they work

Page 1 of 6 123 ... LastLast

Posting Permissions

  • You may not post new threads
  • You may not post replies
  • You may not post attachments
  • You may not edit your posts
  •