Zach McGovern
Certified Finest Installer
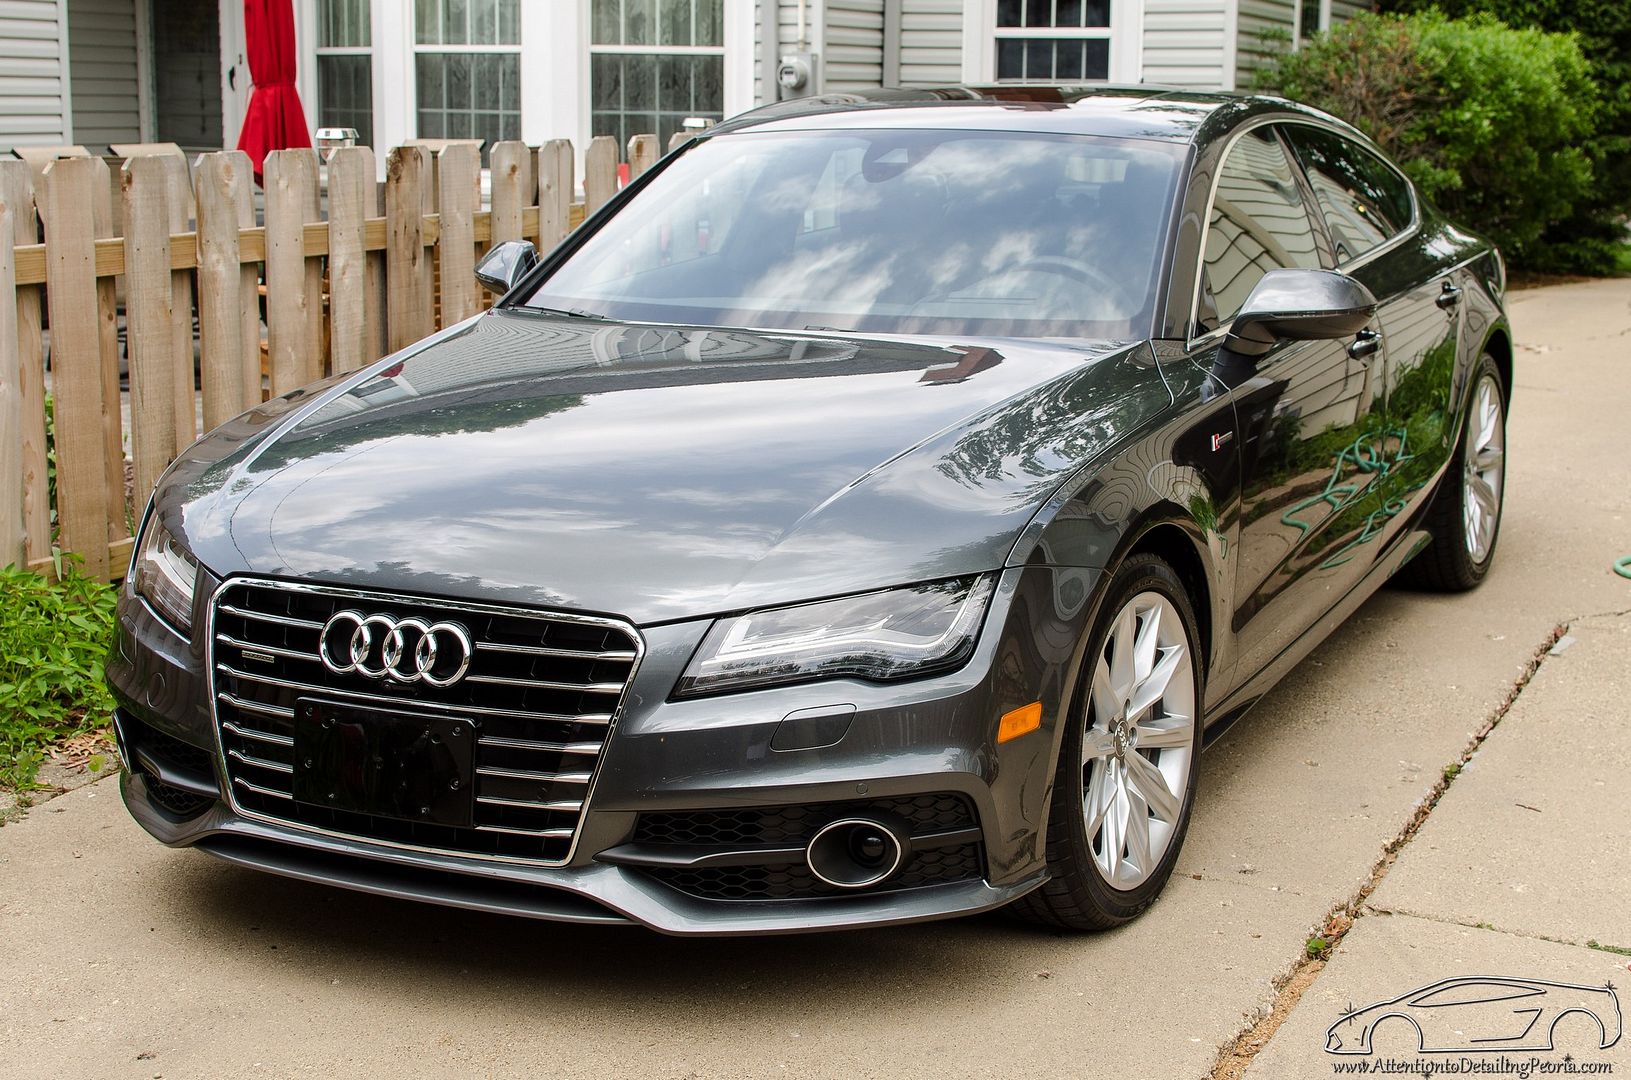
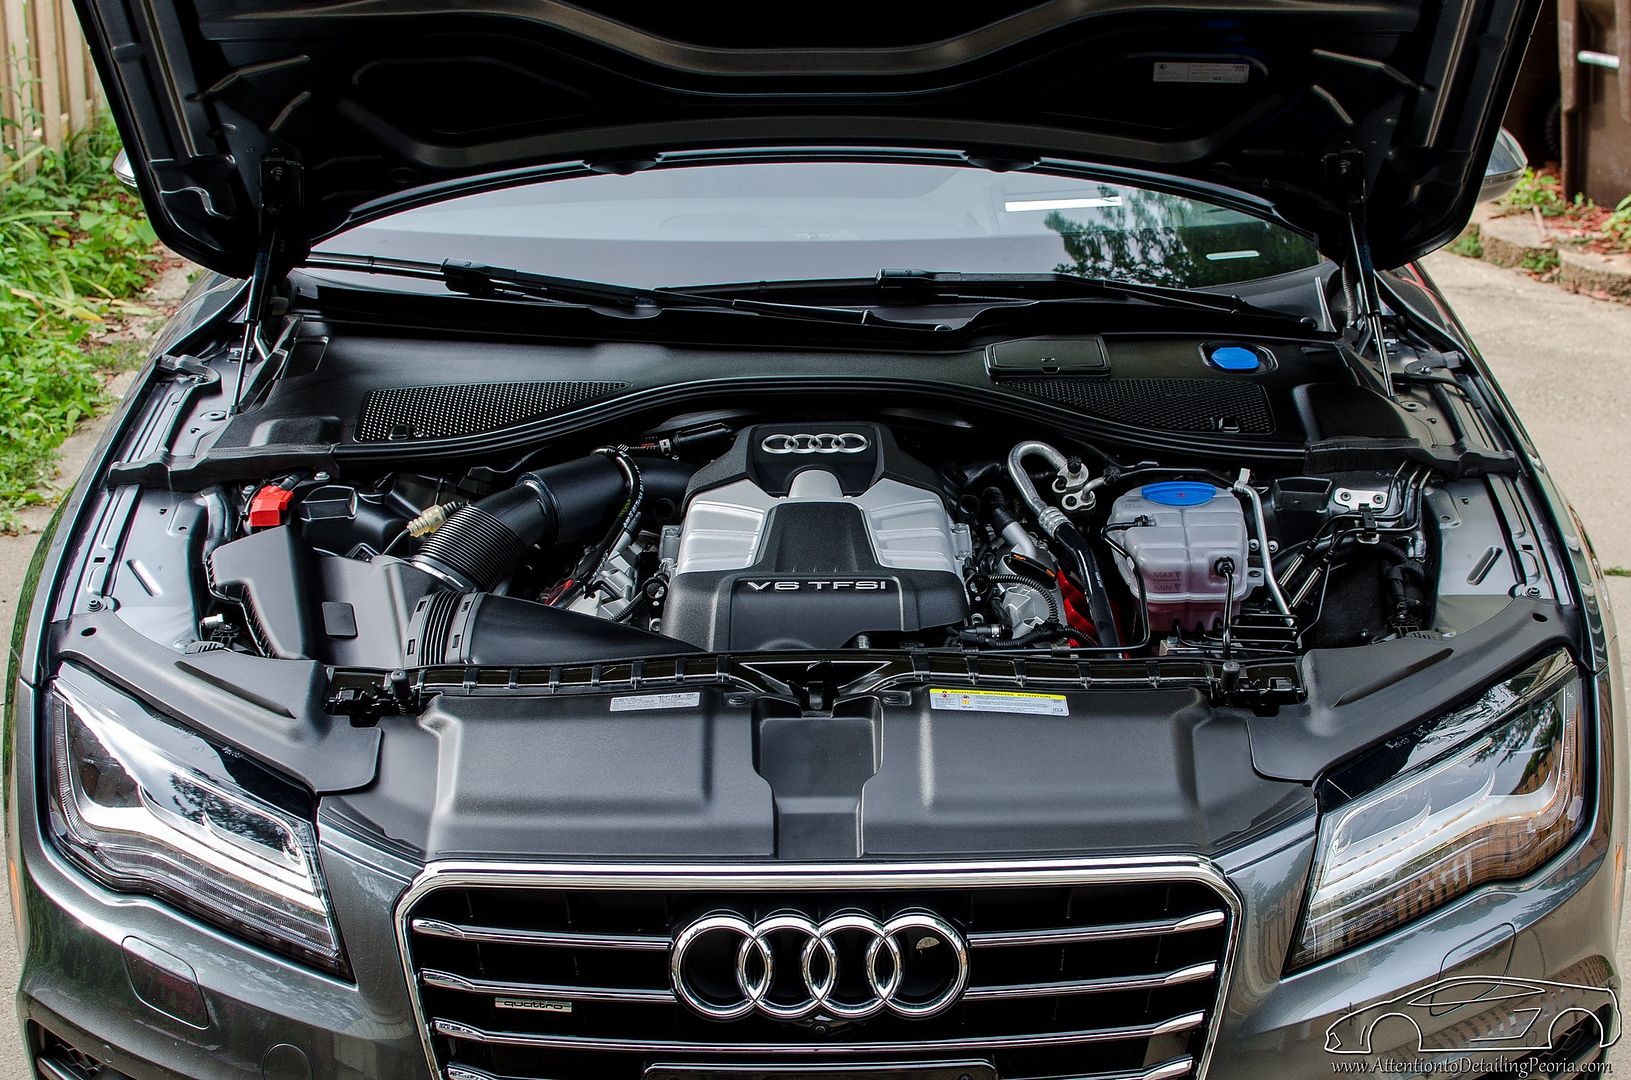
This gorgeous luxury sedan was brought to me for a thorough cleaning, inside and out, as well as our premium CQuartz Finest paint coating for years of durable protection, amazing gloss, and ease of maintenance. We started with a lengthy wash and decontamination process, the paint was the spot corrected to remove some scratches, and then the vehicle was thoroughly polished to a very high gloss. The surface was cleaned again and was then coated with the ceramic coating. The interior was thoroughly vacuumed, all vinyl was protected, and the leather was steam cleaned and then conditioned. The engine was also pampered and looks brand new now. Audi truly captured the definition of luxury with this car... it was a lot of fun working on it for the past few days. It turned out amazing!
Process
Exterior
Tires: Tuf Shine Tire Cleaner & Tire Brush (repeated 7-8 times per tire)
Wheels: Sonax Full Effect, Iron X, Tarminator agitated with various tools and brushes
Foam Pre-Soak: CarPro IronX Snow Foam via DI Foam Lance & Karcher X-Series Pressure Washer
Wash: CarPro IronX Snow Foam (2 bucket method)
Misc. Cleaning (emblems, grills, etc): Meguiar's D103 (10:1) and 1.25" Soft Boar's Hair Brush
Iron/Fallout Removal: CarPro Iron X
Bug & Tar Removal: Tarminator
Decontamination: NanoSkin Fine Grade Mitt with Glide as Lube
Taped off trim and other areas of concern
Paint Thickness Readings Taken
Compound: HD Cut on MF pad via Rupes LHR21es and LHR75e
Polish: HD Polish on Crimson LC Pad via Porter Cable 7424XP and Griot's Garage DA
Polish & Oil Remover: CarPro Eraser
Ceramic Paint Coating: CarPro CQuartz Finest (2 thick coats)
Glass: Polished with Ceriglass and sealed with CarPro Reload
Wheel Protection: CarPro HydrO2
Tire Dressing: Optimum Opti-Bond Tire Gel
Trim: CarPro DLUX
Exhaust Tips: CG Metal Polish + Protection by hand using #0000 steel wool on heavy buildup and a MF towel for the remaining light buildup and oxidation
Interior
Blow out cracks and Crevices w/ Master Blaster Sidekick
Thorough vacuum of all seats and carpets
Dusted Dash and Trim
Vinyl cleaned and protected with 303
Leather Cleaning: Steam cleaned
Leather Conditioner: Griot's Garage Leather Care
Glass: Meguiar's D120 with DI Glass Towels
Odor Removal/Air Freshener: Meguiar's Whole Car Re-Fresher Odor Eliminator Mist
All weather floor mats: Scrubbed with D103, rinsed, and blown dry
Engine
Rinse
Scrubbed with D103 and various brushes
Blown Dry
Plastic dressed and protected with 303 aerospace
Hoses dressed with CG Black on Black
Underside of hood wiped down with UWW+
... I know I am forgetting some steps, but you get the idea
Total time: ~19 hours
Before
The exterior was dirty leaving the paint looking very muted and dull


A car this size needs large brakes to slow it down... this typically means there is a lot of brake dust, and these wheels were covered in it.


The barrels of the wheels appeared to have never been cleaned as they were far dirtier than the faces of the wheels.

Buildup on the exhaust tips

During
As always, I began by cleaning the tires. These tires had an excessive amount of dirt and tire dressing buildup on them. Each tire was sprayed with tire cleaner, scrubbed, and rinsed a total of 7-8 times until they were clean. I used an entire bottle of tire cleaner on these, but it was worth it. (note the warning printed on the tire... kind of funny... haven't seen that before)


Still working on the tires... getting cleaner.

Once the tires were clean, I turned my attention to the wheels. The wheels were sprayed with a liberal amount of wheel cleaner to help loosen the dirt and grime.

This wheel cleaner changes to a bright purple color as it reacts with iron particles (such as brake dust). You can that the wheels were covered with contamination.


There was an impressive amount of filth being washed away from these wheels.

The wheels looked MUCH better after they were cleaned.

The wheels were sealed with HydrO2 to provide additional gloss and protection for the next month or two.

The barrels were also cleaned and sealed, of course.

Next, the grills, emblems, and other smaller areas were thoroughly cleaned with a soft boars hair brush to loosen all of the dirt that collects in these honeycomb designs.

The vehicle was then foamed with a heavy concentration of degreasing shampoo to loosen the heavy dirt buildup and also eliminate any remaining wax or sealant (though the paint appeared to have no protection on it). The vehicle was then rinsed and hand washed.

After the wash process, the vehicle was decontaminated to remove any iron particles, tar buildup, and other bonded contamination. The paint was then polished to near perfection. This vehicle was in pretty good shape from the start, and the highly metallic paint color made it very difficult to capture defects, therefore I did not take the time to try to capture before/after type shots for this project.


Matt working on the final finishing polish... check out those reflections!

The large B-Pillars were in need of some attention. Unfortunately these jet black pillars are painted with some incredibly soft paint and are very easy to scratch/mar.

Pillar before correction


After a 2 step correction

Process
Exterior
Tires: Tuf Shine Tire Cleaner & Tire Brush (repeated 7-8 times per tire)
Wheels: Sonax Full Effect, Iron X, Tarminator agitated with various tools and brushes
Foam Pre-Soak: CarPro IronX Snow Foam via DI Foam Lance & Karcher X-Series Pressure Washer
Wash: CarPro IronX Snow Foam (2 bucket method)
Misc. Cleaning (emblems, grills, etc): Meguiar's D103 (10:1) and 1.25" Soft Boar's Hair Brush
Iron/Fallout Removal: CarPro Iron X
Bug & Tar Removal: Tarminator
Decontamination: NanoSkin Fine Grade Mitt with Glide as Lube
Taped off trim and other areas of concern
Paint Thickness Readings Taken
Compound: HD Cut on MF pad via Rupes LHR21es and LHR75e
Polish: HD Polish on Crimson LC Pad via Porter Cable 7424XP and Griot's Garage DA
Polish & Oil Remover: CarPro Eraser
Ceramic Paint Coating: CarPro CQuartz Finest (2 thick coats)
Glass: Polished with Ceriglass and sealed with CarPro Reload
Wheel Protection: CarPro HydrO2
Tire Dressing: Optimum Opti-Bond Tire Gel
Trim: CarPro DLUX
Exhaust Tips: CG Metal Polish + Protection by hand using #0000 steel wool on heavy buildup and a MF towel for the remaining light buildup and oxidation
Interior
Blow out cracks and Crevices w/ Master Blaster Sidekick
Thorough vacuum of all seats and carpets
Dusted Dash and Trim
Vinyl cleaned and protected with 303
Leather Cleaning: Steam cleaned
Leather Conditioner: Griot's Garage Leather Care
Glass: Meguiar's D120 with DI Glass Towels
Odor Removal/Air Freshener: Meguiar's Whole Car Re-Fresher Odor Eliminator Mist
All weather floor mats: Scrubbed with D103, rinsed, and blown dry
Engine
Rinse
Scrubbed with D103 and various brushes
Blown Dry
Plastic dressed and protected with 303 aerospace
Hoses dressed with CG Black on Black
Underside of hood wiped down with UWW+
... I know I am forgetting some steps, but you get the idea
Total time: ~19 hours
Before
The exterior was dirty leaving the paint looking very muted and dull
A car this size needs large brakes to slow it down... this typically means there is a lot of brake dust, and these wheels were covered in it.
The barrels of the wheels appeared to have never been cleaned as they were far dirtier than the faces of the wheels.
Buildup on the exhaust tips
During
As always, I began by cleaning the tires. These tires had an excessive amount of dirt and tire dressing buildup on them. Each tire was sprayed with tire cleaner, scrubbed, and rinsed a total of 7-8 times until they were clean. I used an entire bottle of tire cleaner on these, but it was worth it. (note the warning printed on the tire... kind of funny... haven't seen that before)
Still working on the tires... getting cleaner.
Once the tires were clean, I turned my attention to the wheels. The wheels were sprayed with a liberal amount of wheel cleaner to help loosen the dirt and grime.
This wheel cleaner changes to a bright purple color as it reacts with iron particles (such as brake dust). You can that the wheels were covered with contamination.
There was an impressive amount of filth being washed away from these wheels.
The wheels looked MUCH better after they were cleaned.
The wheels were sealed with HydrO2 to provide additional gloss and protection for the next month or two.
The barrels were also cleaned and sealed, of course.
Next, the grills, emblems, and other smaller areas were thoroughly cleaned with a soft boars hair brush to loosen all of the dirt that collects in these honeycomb designs.
The vehicle was then foamed with a heavy concentration of degreasing shampoo to loosen the heavy dirt buildup and also eliminate any remaining wax or sealant (though the paint appeared to have no protection on it). The vehicle was then rinsed and hand washed.
After the wash process, the vehicle was decontaminated to remove any iron particles, tar buildup, and other bonded contamination. The paint was then polished to near perfection. This vehicle was in pretty good shape from the start, and the highly metallic paint color made it very difficult to capture defects, therefore I did not take the time to try to capture before/after type shots for this project.
Matt working on the final finishing polish... check out those reflections!
The large B-Pillars were in need of some attention. Unfortunately these jet black pillars are painted with some incredibly soft paint and are very easy to scratch/mar.
Pillar before correction
After a 2 step correction
Last edited:


")